
使用 threejs 创建第一个三维场景
by emanjusaka from https://www.emanjusaka.top/2024/05/threejs-create-3d-scene 彼岸花开可奈何
本文欢迎分享与聚合,全文转载请留下原文地址。
Three.js是一个基于WebGL的强大的JavaScript库,它允许开发者在网页上创建和展示3D图形和动画。通过Three.js,开发者可以直接利用浏览器中的GPU能力来渲染复杂的3D场景,而无需用户安装任何插件。这个库提供了丰富的API,使得开发3D应用、游戏、数据可视化以及交互式体验变得相对简单直觉。现在我们开始我们的第一步创建一个简单的场景。
注意:本篇文章中的示例都是通过 npm 安装的 threejs
创建场景
初始化一个场景需要包括三个最基本的部分:场景、相机、渲染器。
 <!DOCTYPE html>
 <html lang="en">
   <head>
     <meta charset="utf-8" />
     <title>My first three.js app</title>
     <style>
       body {
         margin: 0;
       }
     </style>
   </head>
   <body>
     <script type="module" src="/main.js"></script>
     <div id="webgldiv"></div>
   </body>
 </html>
main.js
import * as THREE from "three";
function init() {
const scene = new THREE.Scene();
const camera = new THREE.PerspectiveCamera(
75,
window.innerWidth / window.innerHeight,
0.1,
1000
);
const renderer = new THREE.WebGLRenderer();
renderer.setSize(window.innerWidth, window.innerHeight);
renderer.setClearColor(new THREE.Color(0x000000));
camera.position.set(-30, 40, 30);
camera.lookAt(scene.position);
document.getElementById("webgldiv").appendChild(renderer.domElement);
// render the scene
renderer.render(scene, camera);
}
init();
增加辅助线
   const axes = new THREE.AxesHelper(20);
   scene.add(axes);
增加一个平面
const planeGeometry = new THREE.PlaneGeometry(60, 30);
const planeMaterial = new THREE.MeshBasicMaterial({ color: 0xcccccc });
const plane = new THREE.Mesh(planeGeometry, planeMaterial);
plane.rotation.x = -0.5 * Math.PI;
plane.position.x = 15;
scene.add(plane);增加三维图形
// create a cube
const cubeGeometry = new THREE.BoxGeometry(4, 4, 4);
const cubeMaterial = new THREE.MeshBasicMaterial({
color: 0xff0000,
wireframe: true,
});
const cube = new THREE.Mesh(cubeGeometry, cubeMaterial);
cube.position.set(-4, 3, 0);
scene.add(cube);
// create a sphere
const sphereGeometry = new THREE.SphereGeometry(4, 20, 20);
const sphereMaterial = new THREE.MeshBasicMaterial({
color: 0x7777ff,
wireframe: true,
});
const sphere = new THREE.Mesh(sphereGeometry, sphereMaterial);
sphere.position.set(20, 4, 2);
scene.add(sphere);材质、光源、阴影
添加光源
 const spotLight = new THREE.SpotLight(0xFFFFFF);
 spotLight.position.set(-40,40,-15);
 spotLight.castShadow = true;
 spotLight.shadow.mapSize = new THREE.Vector2(1024,1024);
 spotLight.shadow.camera.far = 130;
 spotLight.shadow.camera.near = 40;
如果这时候渲染场景会发现看到的结果和没有添加光源时是一样的,这是因为不同的材质对光源的反应是不一样的。我们使用的基本材质(THREE.MeshBasicMaterial)不会对光源有任何反应,基本材质只会使用指定的颜色来渲染物体。
更换材质
const planeGeometry = new THREE.PlaneGeometry(60, 20);
const planeMaterial = new THREE.MeshLambertMaterial({ color: 0xffffff });
const plane = new THREE.Mesh(planeGeometry, planeMaterial);
...
scene.add(plane);
// create a cube
const cubeGeometry = new THREE.BoxGeometry(4, 4, 4);
const cubeMaterial = new THREE.MeshLambertMaterial({ color: 0xff0000 });
const cube = new THREE.Mesh(cubeGeometry, cubeMaterial);
...
scene.add(cube);
// create a sphere
const sphereGeometry = new THREE.SphereGeometry(4, 20, 20);
const sphereMaterial = new THREE.MeshLambertMaterial({ color: 0x7777ff });
const sphere = new THREE.Mesh(sphereGeometry, sphereMaterial);
...
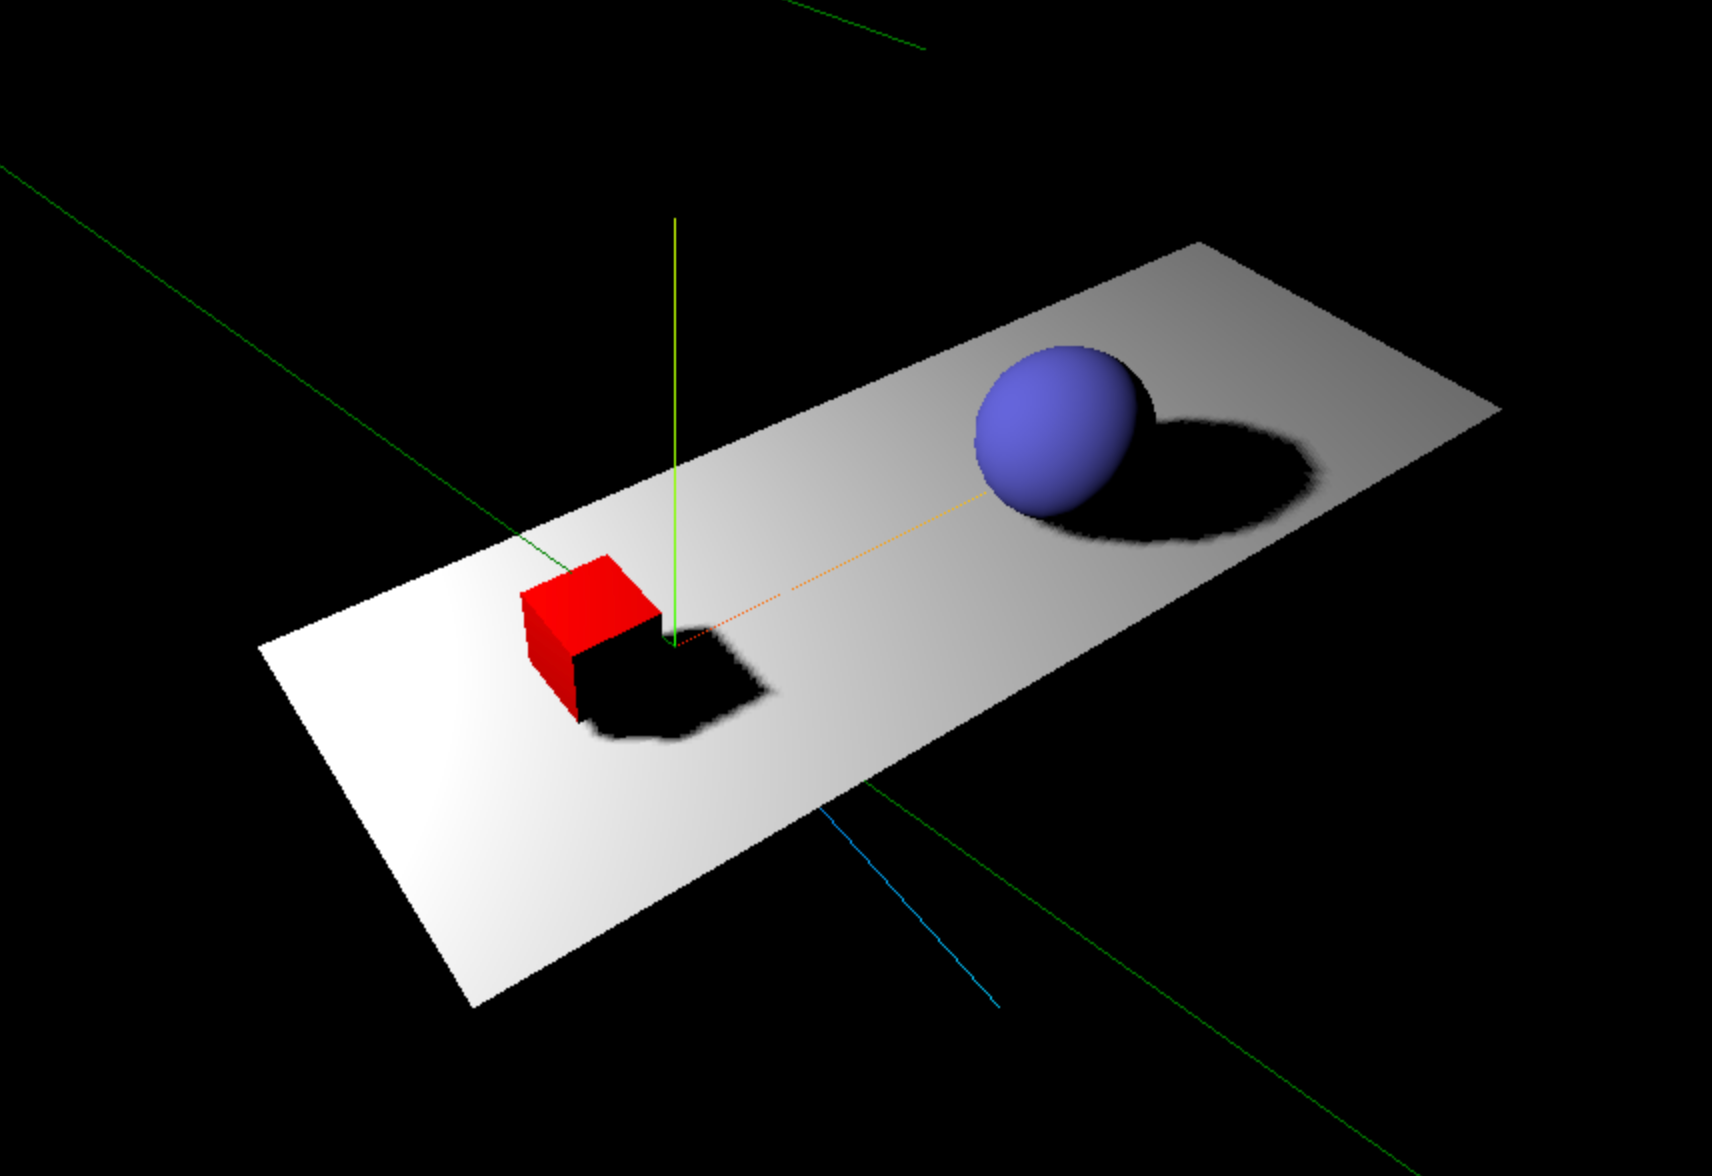
scene.add(sphere);添加阴影
默认情况下 Three.js 中是不会渲染阴影的。修改代码让其渲染阴影效果。
renderer.shadowMap.enabled = true;还需要明确哪个物体投射阴影、哪个物体接受阴影。
   plane.receiveShadow = true;
   ...
   cube.castShadow = true;
   ...
   sphere.castShadow = true;
聚光灯光源默认是禁用阴影的,需要设置属性 castShadow 为 true。
spotLight.castShadow = true;展示效果
添加动画
引入 requestAnimationFrame() 方法
如果希望我们的场景动起来,那么首先需要解决的问题是如何在特定的时间间隔重新渲染场景,requestAnimationFrame() 方法可以帮助我们做到循环渲染效果。
   function animate() {
     requestAnimationFrame(animate);
     // 如果有动画或更新逻辑,放在这里
     renderer.render(scene, camera);
   }
   animate();
旋转正方体
   function animate() {
     requestAnimationFrame(animate);
     // 如果有动画或更新逻辑,放在这里
     cube.rotateX(0.02);
     cube.rotateY(0.02);
     cube.rotateZ(0.02);
     renderer.render(scene, camera);
   }
   animate();
让小球弹跳起来
let step = 0;
function animate() {
requestAnimationFrame(animate);
// 如果有动画或更新逻辑,放在这里
step += 0.04;
sphere.position.x = 20 + 10 * Math.cos(step);
sphere.position.y = 2 + 10 * Math.abs(Math.sin(step));
renderer.render(scene, camera);
}
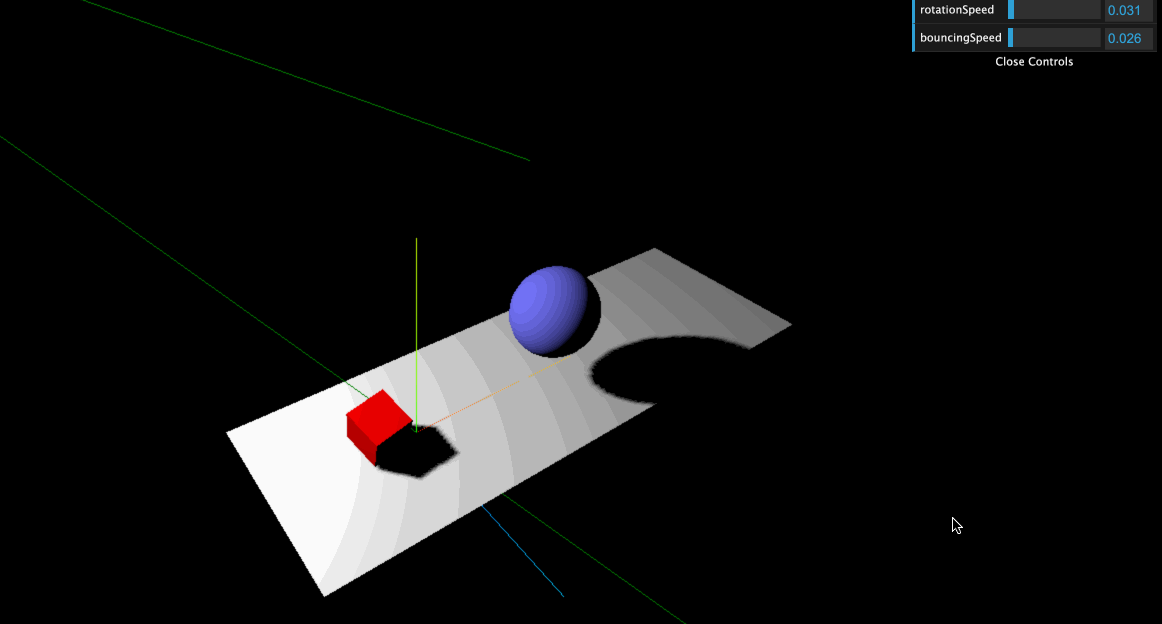
animate();创建可视化界面
引入 dat.GUI 的库
npm install --save dat.gui高版本的 npm 安装这个依赖可能会报错
npm ERR! code EUNSUPPORTEDPROTOCOL
npm ERR! Unsupported URL Type "link:": link:./src/types
这是因为在NPM的最新版本中,
link已经被file所取代。如果报错可以使用 yarn 安装
npm install -g yarn
yarn add dat.gui
场景对浏览器的自适应
为浏览器注册一个事件监听器,每当浏览器尺寸改变时 onResize() 方法就会被执行,在方法中更新摄像机和渲染器。
 window.addEventListener("resize", onResize, false);
 function onResize() {
   camera.aspect = window.innerWidth / window.innerHeight;
   camera.updateProjectionMatrix();
   renderer.setSize(window.innerWidth, window.innerHeight);
 }
最终效果
完整代码
index.html
<!DOCTYPE html>
<html lang="en">
<head>
<meta charset="utf-8" />
<title>My first three.js app</title>
<style>
body {
margin: 0;
}
</style>
</head>
<body>
<script type="module" src="/main.js"></script>
<div id="webgldiv"></div>
</body>
</html>
main.js
import * as THREE from "three";
import dat from "dat.gui";
let camera;
let scene;
let renderer;
function init() {
scene = new THREE.Scene();
camera = new THREE.PerspectiveCamera(
75,
window.innerWidth / window.innerHeight,
0.1,
1000
);
camera.position.set(-20, 40, 30);
camera.lookAt(scene.position);
renderer = new THREE.WebGLRenderer();
renderer.setSize(window.innerWidth, window.innerHeight);
renderer.setClearColor(new THREE.Color(0x000000));
renderer.shadowMap.enabled = true;
const axes = new THREE.AxesHelper(20);
scene.add(axes);
document.getElementById("webgldiv").appendChild(renderer.domElement);
const spotLight = new THREE.SpotLight(0xffffff);
spotLight.position.set(-30, 40, -15);
spotLight.intensity = 8000;
spotLight.castShadow = true;
spotLight.shadow.mapSize = new THREE.Vector2(1024, 1024);
spotLight.shadow.camera.far = 130;
spotLight.shadow.camera.near = 40;
scene.add(spotLight);
const mySpotLightHelper = new THREE.SpotLightHelper(spotLight, "green");
scene.add(mySpotLightHelper);
const planeGeometry = new THREE.PlaneGeometry(60, 20);
const planeMaterial = new THREE.MeshLambertMaterial({ color: 0xffffff });
const plane = new THREE.Mesh(planeGeometry, planeMaterial);
plane.rotation.x = -0.5 * Math.PI;
plane.position.x = 15;
plane.receiveShadow = true;
scene.add(plane);
// create a cube
const cubeGeometry = new THREE.BoxGeometry(4, 4, 4);
const cubeMaterial = new THREE.MeshLambertMaterial({ color: 0xff0000 });
const cube = new THREE.Mesh(cubeGeometry, cubeMaterial);
cube.position.set(-4, 3, 0);
cube.castShadow = true;
scene.add(cube);
// create a sphere
const sphereGeometry = new THREE.SphereGeometry(4, 20, 20);
const sphereMaterial = new THREE.MeshLambertMaterial({ color: 0x7777ff });
const sphere = new THREE.Mesh(sphereGeometry, sphereMaterial);
sphere.position.set(20, 4, 2);
sphere.castShadow = true;
scene.add(sphere);
// create gui
let controls = new (function () {
this.rotationSpeed = 0.02;
this.bouncingSpeed = 0.03;
})();
const gui = new dat.GUI();
gui.add(controls, "rotationSpeed", 0, 0.5);
gui.add(controls, "bouncingSpeed", 0, 0.5);
let step = 0;
function animate() {
requestAnimationFrame(animate);
// 如果有动画或更新逻辑,放在这里
cube.rotateX(controls.rotationSpeed);
cube.rotateY(controls.rotationSpeed);
cube.rotateZ(controls.rotationSpeed);
step += controls.bouncingSpeed;
sphere.position.x = 20 + 10 * Math.cos(step);
sphere.position.y = 2 + 10 * Math.abs(Math.sin(step));
renderer.render(scene, camera);
}
animate();
}
window.addEventListener("resize", onResize, false);
function onResize() {
camera.aspect = window.innerWidth / window.innerHeight;
camera.updateProjectionMatrix();
renderer.setSize(window.innerWidth, window.innerHeight);
}
init();总结
使用 threejs 创建一个三维场景还是比较简单的。我们首先定义了 场景、摄像机、渲染器,这是三维场景必须得元素。我们在其中创建了一个平面、正方体和一个球体,然后改变了它们的材质新增了聚光灯光源并且渲染出阴影。之后我们添加了动画让正方体进行了旋转让小球弹跳了起来,还增加了可视化界面可以方便的调节正方体的旋转速度和小球的弹跳速度。最后我们对场景和浏览器的自适应进行了优化。通过这些一系列的操作,我们的第一个三维场景就创建完成了还是比较简单的吧~
在技术的星河中遨游,我们互为引路星辰,共同追逐成长的光芒。愿本文的洞见能触动您的思绪,若有所共鸣,请以点赞之手,轻抚赞同的弦。
原文地址: https://www.emanjusaka.top/2024/05/threejs-create-3d-scene
微信公众号:emanjusaka的编程栈
- 0
- 0
-
赞助
 微信
微信
 支付宝
支付宝
-
分享